> ## Documentation Index
> Fetch the complete documentation index at: https://docs.dataerai.com/llms.txt
> Use this file to discover all available pages before exploring further.
# Collections
> Group assets into nestable collections within a project to mirror how your team thinks about its data.
A **collection** is a folder-like container that groups [assets](/organize/assets) inside a project. Collections can nest inside one another, so you can build a structure that mirrors how you already think about your data — by experiment, instrument, sample, or date.
 ## Create a collection
Inside a project (or another collection, to nest), click **New collection** in the toolbar.
## Create a collection
Inside a project (or another collection, to nest), click **New collection** in the toolbar.
 Give the collection a **Name** and an optional **Description**.
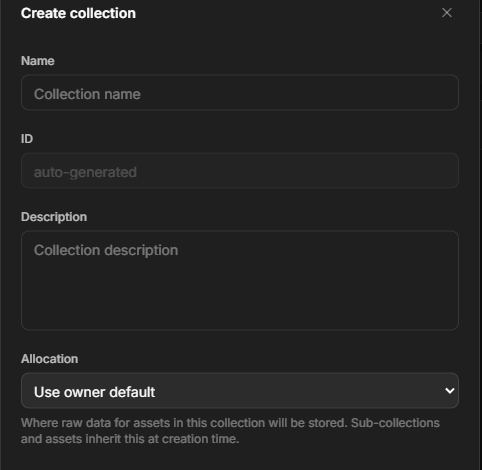 Pick an **Allocation** — where the raw data for assets in this collection is stored. Leave it on **Use owner default** unless your team uses more than one. Sub-collections and assets inherit this choice when they're created. See [Storage](/account/storage).
Click **Create**. If you have permission, you can also set who can access the collection at creation time.
## Nesting and navigation
Collections can contain both assets and other collections. As you move into nested collections, the path above the list shows where you are and lets you jump back up the hierarchy.
In **List view**, use the disclosure arrow next to a collection to preview its contents inline. Expanded collections can show nested collections and assets without moving you out of the current collection. If an expanded collection has more assets than the first page, click **Continue loading files** in that collection's inline section to load the next page.
Use the view controls above the list to switch how the collection is displayed:
* **List view** shows rows with name, type, creator, and updated date.
* **Icon view** shows larger tiles for scanning assets and collections visually.
* **Column view** shows adjacent list columns. Select a collection to open its contents in the next column without leaving the current path.
* **Gallery view** shows a larger preview with a horizontal strip of items.
Use **Object size** to make tiles and previews smaller or larger. Dataerai keeps your selected view and object size after you reload the page.
## README
A collection can have a **README** — a Markdown document that introduces the whole group of data: what it contains, how it's organized, and how to use it. Switch from the **Data** tab to the **Readme** tab to read or edit it. Each collection (and sub-collection) has its own README, so you can document a nested structure at whatever level makes sense. See [Notes, comments & discussion](/organize/notes-and-comments).
## Stars
**Star** a collection to bookmark it for quick access later. Starred collections float to the top of your lists. You can star projects and assets the same way.
## Access
Access set on a collection cascades to the assets and sub-collections inside it. You can also grant access to a specific item to widen or narrow it. See [Sharing & permissions](/sharing/permissions).
## Deleting a collection
Select a collection (or several) and choose **Delete** to remove it along with the sub-collections and assets that live *only* inside it. Items that are also linked elsewhere — shared sub-collections, or assets that belong to another collection too — are left untouched.
Deleting a **small** collection happens immediately. Deleting a **very large** collection (many thousands of assets) would otherwise tie up the page, so it runs **in the background** instead: the collection disappears from your view right away and a short message confirms the cleanup is finishing on its own. You can keep working — there's nothing to wait for. If the background cleanup can't complete, the collection reappears and we let you know so you can try again.
Root collections can't be deleted — they anchor your workspace.
## Next steps
What lives inside a collection.
Repositories and allocations explained.
Control who can see and edit a collection.
Pick an **Allocation** — where the raw data for assets in this collection is stored. Leave it on **Use owner default** unless your team uses more than one. Sub-collections and assets inherit this choice when they're created. See [Storage](/account/storage).
Click **Create**. If you have permission, you can also set who can access the collection at creation time.
## Nesting and navigation
Collections can contain both assets and other collections. As you move into nested collections, the path above the list shows where you are and lets you jump back up the hierarchy.
In **List view**, use the disclosure arrow next to a collection to preview its contents inline. Expanded collections can show nested collections and assets without moving you out of the current collection. If an expanded collection has more assets than the first page, click **Continue loading files** in that collection's inline section to load the next page.
Use the view controls above the list to switch how the collection is displayed:
* **List view** shows rows with name, type, creator, and updated date.
* **Icon view** shows larger tiles for scanning assets and collections visually.
* **Column view** shows adjacent list columns. Select a collection to open its contents in the next column without leaving the current path.
* **Gallery view** shows a larger preview with a horizontal strip of items.
Use **Object size** to make tiles and previews smaller or larger. Dataerai keeps your selected view and object size after you reload the page.
## README
A collection can have a **README** — a Markdown document that introduces the whole group of data: what it contains, how it's organized, and how to use it. Switch from the **Data** tab to the **Readme** tab to read or edit it. Each collection (and sub-collection) has its own README, so you can document a nested structure at whatever level makes sense. See [Notes, comments & discussion](/organize/notes-and-comments).
## Stars
**Star** a collection to bookmark it for quick access later. Starred collections float to the top of your lists. You can star projects and assets the same way.
## Access
Access set on a collection cascades to the assets and sub-collections inside it. You can also grant access to a specific item to widen or narrow it. See [Sharing & permissions](/sharing/permissions).
## Deleting a collection
Select a collection (or several) and choose **Delete** to remove it along with the sub-collections and assets that live *only* inside it. Items that are also linked elsewhere — shared sub-collections, or assets that belong to another collection too — are left untouched.
Deleting a **small** collection happens immediately. Deleting a **very large** collection (many thousands of assets) would otherwise tie up the page, so it runs **in the background** instead: the collection disappears from your view right away and a short message confirms the cleanup is finishing on its own. You can keep working — there's nothing to wait for. If the background cleanup can't complete, the collection reappears and we let you know so you can try again.
Root collections can't be deleted — they anchor your workspace.
## Next steps
What lives inside a collection.
Repositories and allocations explained.
Control who can see and edit a collection.