> ## Documentation Index
> Fetch the complete documentation index at: https://docs.dataerai.com/llms.txt
> Use this file to discover all available pages before exploring further.
# Getting started
> Create an account, sign in (password or Globus), land on your workspace, and create your first project in Dataerai.
A hands-on walkthrough of signing in, finding your way around Dataerai, and
creating your first project.
## Overview
Use this tutorial when you are new to Dataerai and want to reach your first
workspace.
You'll do four things:
* Create an account or sign in with Globus.
* Land on **Home**, where your projects are listed.
* Create your first **Project**.
* Open that project so you are ready to add data.
How Dataerai is organized:
* **Projects** hold a body of work.
* **Collections** organize files inside a project.
* **Assets** are the individual records you upload or create.
Good to know:
* Email/password accounts must verify email before first sign-in.
* Globus sign-in uses your trusted identity provider and skips email
verification.
* Uploading data, organizing files, search, and collaboration are covered in the
next tutorials.
## Optional: run the code examples
The code blocks below are optional. Run this setup once if you want to follow the
same steps from Python.
The examples use the public REST API with a bearer token. Set
`DATAERAI_SERVER` to your Dataerai site and `DATAERAI_TOKEN` to an access token
for your account.
```python theme={null}
import os, requests
API = os.environ.get("DATAERAI_SERVER", "https://")
TOKEN = os.environ["DATAERAI_TOKEN"]
api = requests.Session()
api.headers.update({"Authorization": f"Bearer {TOKEN}"})
me = api.get(f"{API}/api/me/").json()
print("Signed in as", me["email"], "-", me["name"])
```
## 1. Sign in
Open the Console in a browser. If you are not signed in, the app redirects you to
the sign-in page.
**In the app**
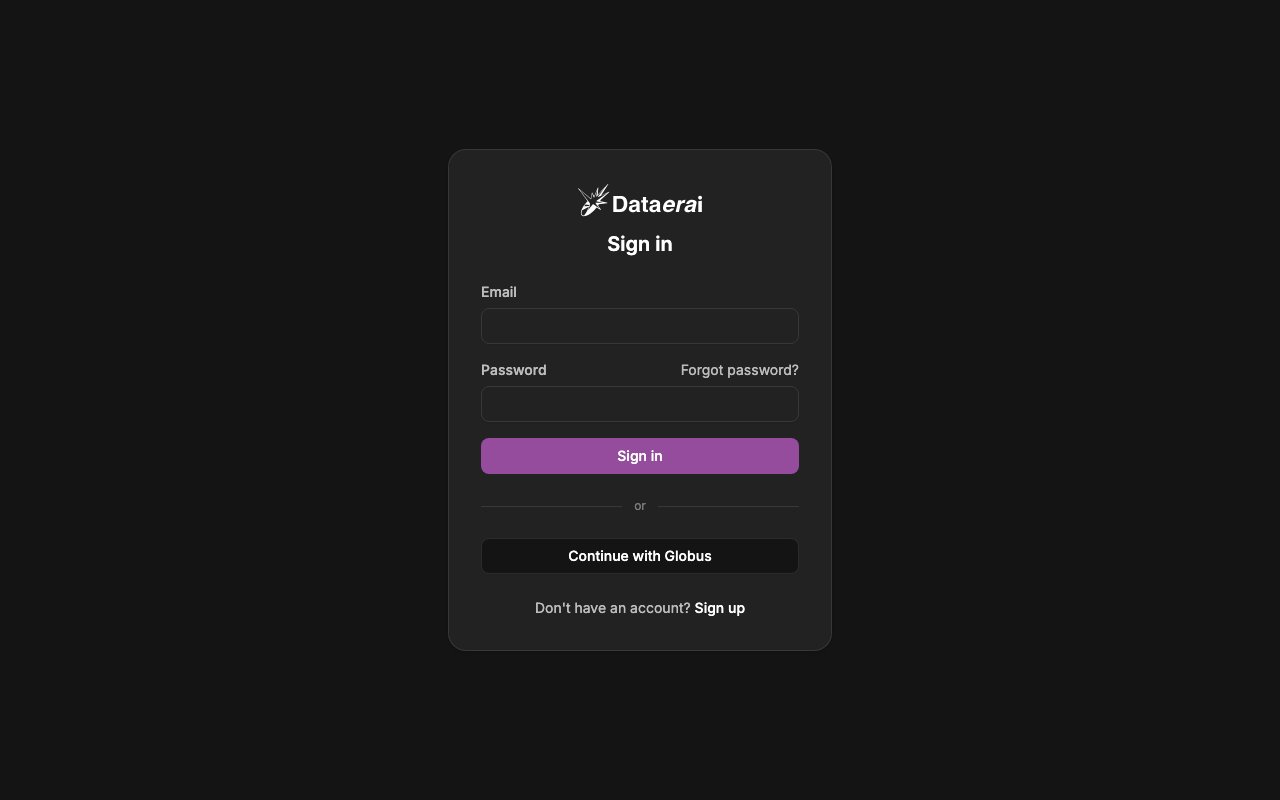
1. Go to your Dataerai instance — you land on the **Sign in** page (`/login`).
2. Type your **Email** and **Password**, then click the purple **Sign in**
button. (Forgot it? Use the **Forgot password?** link.)
3. To use an institutional identity instead, click **Continue with Globus** —
this redirects you to Globus and returns you to the app once authorized.
 **From code**
The setup block above created an authenticated API session. Confirm it by
reading your profile:
```python theme={null}
me = api.get(f"{API}/api/me/").json()
print("Signed in as", me["email"])
```
## 2. Create an account
New here? Register before your first sign-in.
**In the app**
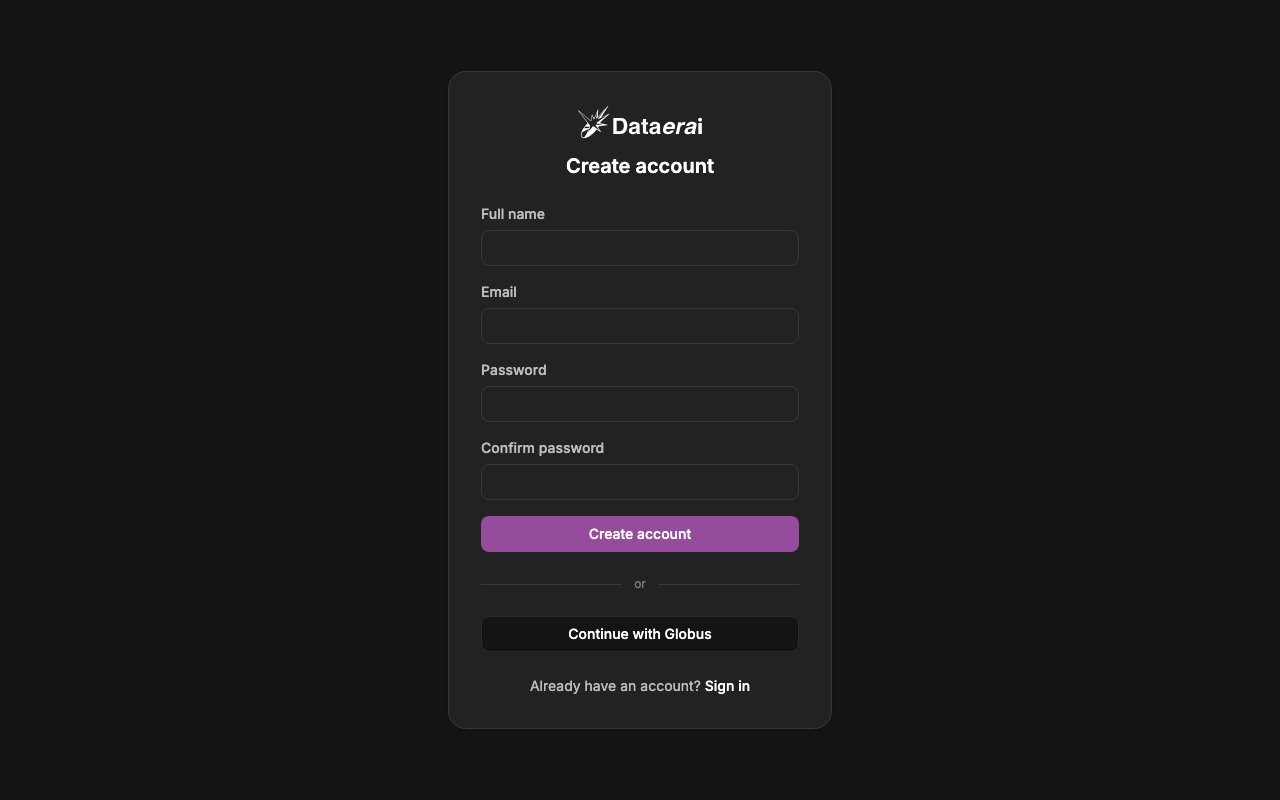
1. On the Sign in page, click the **Sign up** link (in *Don't have an account?
Sign up*) to open the create-account form at `/signup`.
2. Fill **Full name**, **Email**, **Password**, and **Confirm password**, then
click **Create account**. (If the two passwords differ, the form shows
*Passwords do not match.*)
3. You then see a **Check your inbox** confirmation. Click the verification link
sent to your email, then use **Back to sign in** to return and sign in.
**From code**
The setup block above created an authenticated API session. Confirm it by
reading your profile:
```python theme={null}
me = api.get(f"{API}/api/me/").json()
print("Signed in as", me["email"])
```
## 2. Create an account
New here? Register before your first sign-in.
**In the app**
1. On the Sign in page, click the **Sign up** link (in *Don't have an account?
Sign up*) to open the create-account form at `/signup`.
2. Fill **Full name**, **Email**, **Password**, and **Confirm password**, then
click **Create account**. (If the two passwords differ, the form shows
*Passwords do not match.*)
3. You then see a **Check your inbox** confirmation. Click the verification link
sent to your email, then use **Back to sign in** to return and sign in.
 **From code**
Create accounts in the app so users can complete email verification or Globus
sign-in in the normal browser flow. Programmatic account creation is not covered
in the public tutorials.
## 3. Your workspace
After signing in you land on **Home** — the top of your data hierarchy. Each row
is a **Project**; projects hold **Collections**, which hold **Assets**.
**In the app**
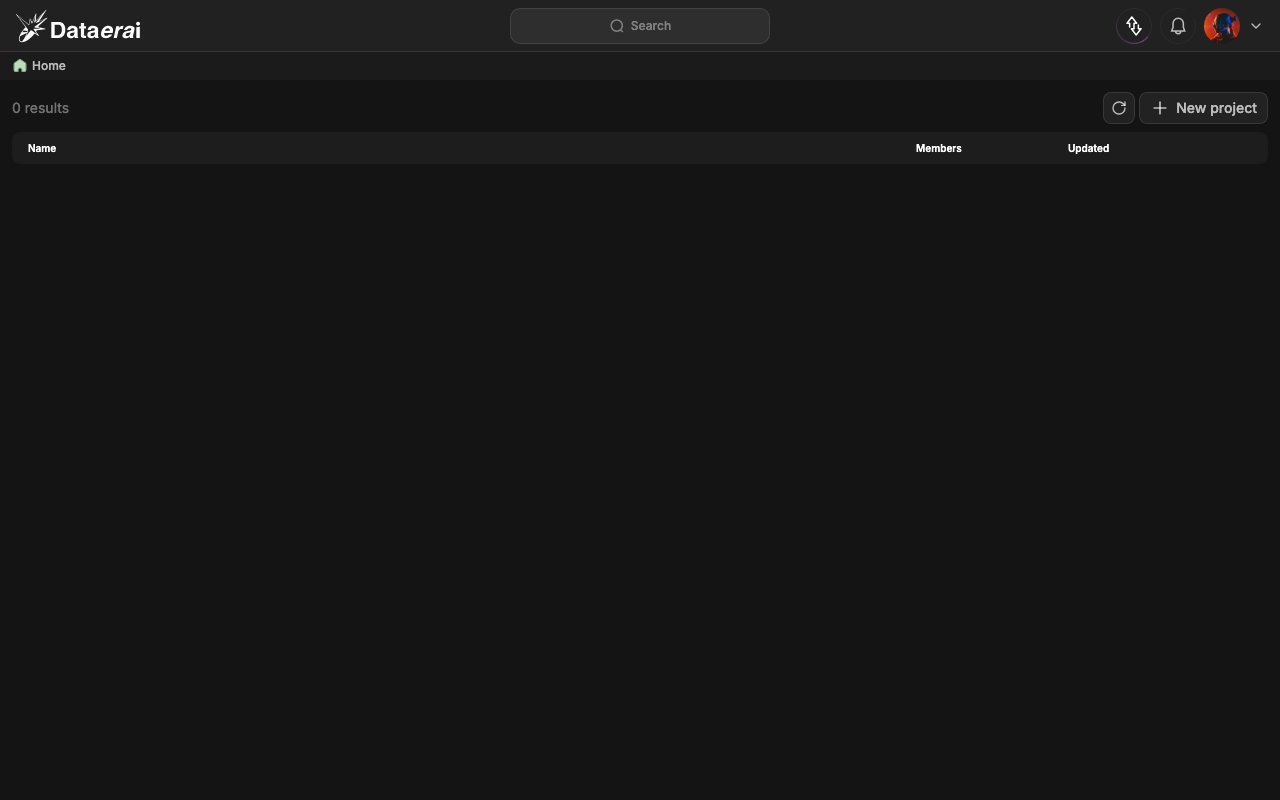
1. After signing in you arrive at **Home**. The header shows the Dataerai logo,
a centered **Search** bar, a notifications bell, and the user account menu.
2. The main panel lists your **Projects** in a table with **Name**, **Members**,
and **Updated** columns and an *N results* count. Each row is a folder icon,
the project name, its member count, the last-updated date, and a star toggle.
3. Use **Search** at the top to jump to anything; click a project row to open it.
**From code**
Create accounts in the app so users can complete email verification or Globus
sign-in in the normal browser flow. Programmatic account creation is not covered
in the public tutorials.
## 3. Your workspace
After signing in you land on **Home** — the top of your data hierarchy. Each row
is a **Project**; projects hold **Collections**, which hold **Assets**.
**In the app**
1. After signing in you arrive at **Home**. The header shows the Dataerai logo,
a centered **Search** bar, a notifications bell, and the user account menu.
2. The main panel lists your **Projects** in a table with **Name**, **Members**,
and **Updated** columns and an *N results* count. Each row is a folder icon,
the project name, its member count, the last-updated date, and a star toggle.
3. Use **Search** at the top to jump to anything; click a project row to open it.
 **From code**
The same project list backs Home. `GET /api/projects/` returns your projects
(starred first, then newest); the web app renders this response.
```python theme={null}
projects = api.get(f"{API}/api/projects/").json()
print(f"{len(projects)} projects")
for p in projects[:5]:
print("-", p["name"], "|", p["id"])
```
## 4. Create your first project
Creating a project gives your data a home. A new project automatically gets a
place for its contents, makes you the project owner, assigns default storage,
and sets the access controls that let you work inside it.
**In the app**
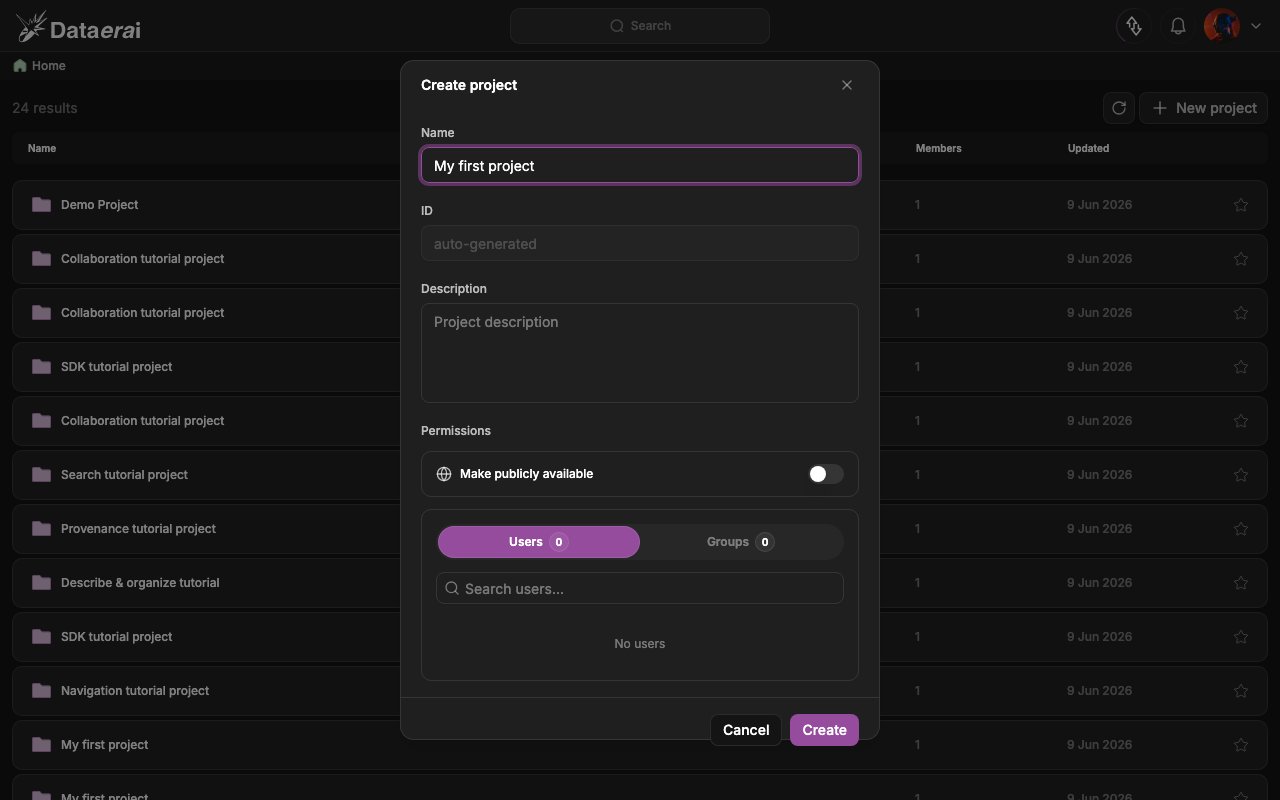
1. On Home (the root view), click **+ New project** in the top-right — it is only
shown at the Home/root view.
2. In the **Create project** dialog, type a **Name** (required; placeholder
*Project name*) and an optional **Description** (placeholder *Project
description*).
3. Click **Create** (it shows *Saving…* while it saves). The new project appears
in the Home list.
4. Click the new project's row to open it. Inside a project the toolbar swaps to
**Upload**, **New collection**, and **New asset** actions — the starting point
for the next tutorials.
**From code**
The same project list backs Home. `GET /api/projects/` returns your projects
(starred first, then newest); the web app renders this response.
```python theme={null}
projects = api.get(f"{API}/api/projects/").json()
print(f"{len(projects)} projects")
for p in projects[:5]:
print("-", p["name"], "|", p["id"])
```
## 4. Create your first project
Creating a project gives your data a home. A new project automatically gets a
place for its contents, makes you the project owner, assigns default storage,
and sets the access controls that let you work inside it.
**In the app**
1. On Home (the root view), click **+ New project** in the top-right — it is only
shown at the Home/root view.
2. In the **Create project** dialog, type a **Name** (required; placeholder
*Project name*) and an optional **Description** (placeholder *Project
description*).
3. Click **Create** (it shows *Saving…* while it saves). The new project appears
in the Home list.
4. Click the new project's row to open it. Inside a project the toolbar swaps to
**Upload**, **New collection**, and **New asset** actions — the starting point
for the next tutorials.
 **From code**
`POST /api/projects/` creates a project. Only `name` (required, non-blank) and
`description` (optional) are writable — everything else is server-assigned.
A successful create returns `201 Created` with the new project's `id` and
auto-provisioned `root_collection_id`. If you call this endpoint from a
signed-in browser session instead of a bearer token, include the CSRF header
required for session-cookie requests.
```python theme={null}
resp = api.post(f"{API}/api/projects/",
json={"name": "My first project",
"description": "Created from the getting-started tutorial."})
resp.raise_for_status() # HTTP 201 Created
project = resp.json()
print("Created project:", project["id"])
print("Root collection:", project["root_collection_id"])
```
## 5. The SDK — your on-ramp to transfers
File transfers use the `dataerai` CLI or SDK rather than raw REST calls.
Authenticate the CLI once with `dataerai auth login`, then use the SDK for
uploads and downloads. Project creation still uses the REST API call shown
above.
```python theme={null}
from dataerai import DataeraiClient
with DataeraiClient(binary_path="dataerai") as client:
status = client.auth_status()
print(f"Signed in as {status.user_email}; token expires {status.expires_at}")
```
## Next steps
* [Data and navigation](/tutorials/02-data-and-navigation/data-and-navigation)
* [Get data in and out](/tutorials/03-data-in-and-out/data-in-and-out)
* [Search & discover](/tutorials/06-search)
**From code**
`POST /api/projects/` creates a project. Only `name` (required, non-blank) and
`description` (optional) are writable — everything else is server-assigned.
A successful create returns `201 Created` with the new project's `id` and
auto-provisioned `root_collection_id`. If you call this endpoint from a
signed-in browser session instead of a bearer token, include the CSRF header
required for session-cookie requests.
```python theme={null}
resp = api.post(f"{API}/api/projects/",
json={"name": "My first project",
"description": "Created from the getting-started tutorial."})
resp.raise_for_status() # HTTP 201 Created
project = resp.json()
print("Created project:", project["id"])
print("Root collection:", project["root_collection_id"])
```
## 5. The SDK — your on-ramp to transfers
File transfers use the `dataerai` CLI or SDK rather than raw REST calls.
Authenticate the CLI once with `dataerai auth login`, then use the SDK for
uploads and downloads. Project creation still uses the REST API call shown
above.
```python theme={null}
from dataerai import DataeraiClient
with DataeraiClient(binary_path="dataerai") as client:
status = client.auth_status()
print(f"Signed in as {status.user_email}; token expires {status.expires_at}")
```
## Next steps
* [Data and navigation](/tutorials/02-data-and-navigation/data-and-navigation)
* [Get data in and out](/tutorials/03-data-in-and-out/data-in-and-out)
* [Search & discover](/tutorials/06-search)