> ## Documentation Index
> Fetch the complete documentation index at: https://docs.dataerai.com/llms.txt
> Use this file to discover all available pages before exploring further.
# Data in & out: upload and download
> Move file bytes between your machine and Dataerai — upload files, directories, and bundles, then download them back — and track every transfer.
Move file bytes between your machine and Dataerai, and prove the round-trip.
Screenshots show the current app workflow.
## Overview
Use this tutorial when you want to move files into or out of Dataerai.
You'll learn how to:
* Upload a file or folder into a project.
* Add tags and upload settings before transfer.
* Watch transfer progress.
* Download the file again.
For everyday use:
* Use the **Upload** dialog for browser uploads.
* Use row actions to download an asset.
* Use the transfer tracker to watch progress and troubleshoot failures.
For large or repeated transfers:
* Use the desktop app, CLI, or Python SDK.
* Transfers can resume if interrupted.
* Multi-file and directory uploads are supported.
File bytes move through the Dataerai transfer clients, not through plain JSON
API responses. Programmatic upload and download use the SDK or CLI.
## Set up: log in and create a destination project
The setup creates a project to upload into and keeps its **name** as well as
its id. In the web app you'd click **New project** on Home instead.
```python theme={null}
import os, csv, pathlib, requests
API = os.environ.get("DATAERAI_SERVER", "https://")
TOKEN = os.environ["DATAERAI_TOKEN"]
_api = requests.Session()
_api.headers.update({"Authorization": f"Bearer {TOKEN}"})
# Create the destination project and keep BOTH its id and its name.
_resp = _api.post(f"{API}/api/projects/",
json={"name": "SDK tutorial project",
"description": "Created from code by this tutorial."})
_resp.raise_for_status()
PROJECT_ID = _resp.json()["id"]
PROJECT_NAME = _resp.json()["name"]
# A small sample dataset to upload.
DATA_FILE = pathlib.Path.home() / "dataerai-tutorial" / "data.csv"
DATA_FILE.parent.mkdir(parents=True, exist_ok=True)
with open(DATA_FILE, "w", newline="") as _fh:
_w = csv.writer(_fh); _w.writerow(["id", "value"])
for _i in range(10): _w.writerow([_i, _i * _i])
print("project :", PROJECT_NAME, f"({PROJECT_ID})")
print("data file :", DATA_FILE)
```
## Upload data
Get a file into a project's collection — from the app or from code.
**In the app**
1. Log in and on **Home** double-click a project to open it, then drill into a
collection to reach its workspace (e.g. **Synthetic PLD Experiments** >
**PLD-0000**).
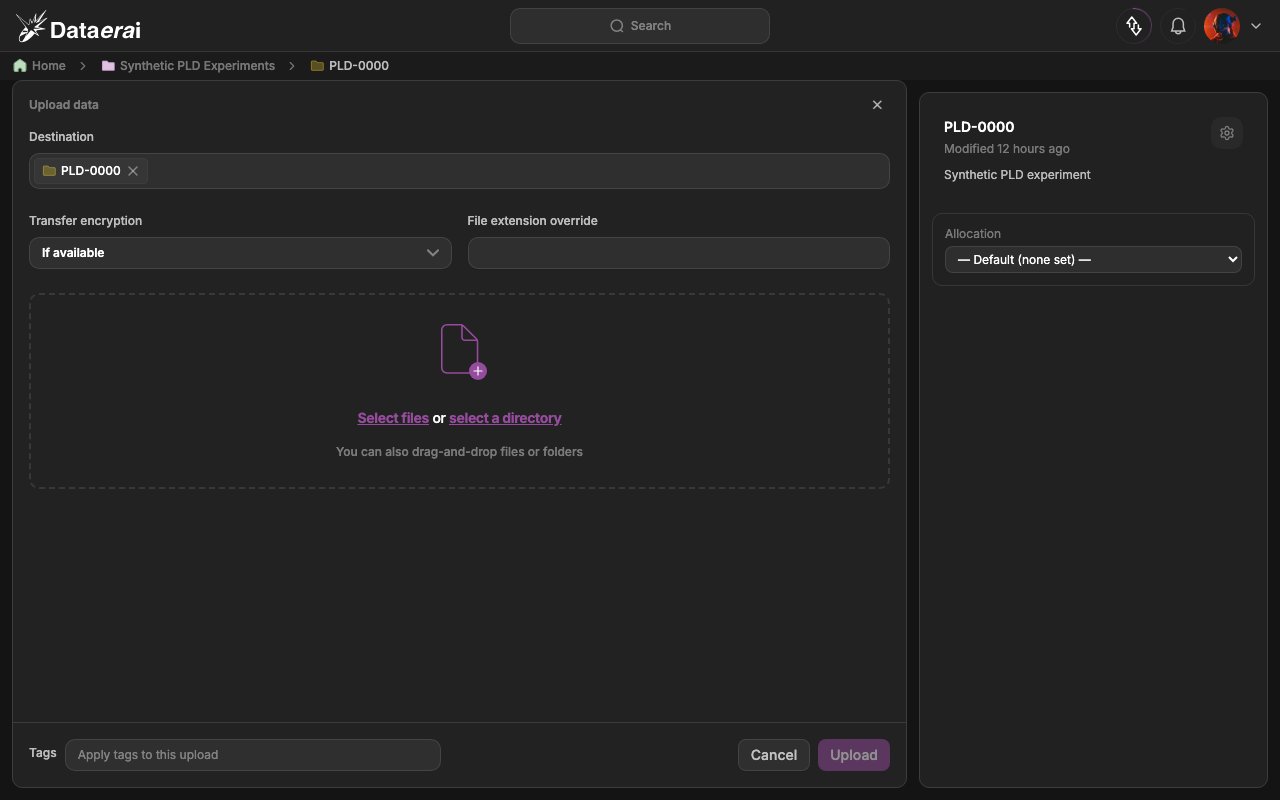
2. Click **Upload** to open the **Upload data** dialog. The **Destination** chip
shows the current collection.
3. Use **Select files**, **select a directory**, or drag-and-drop. Optionally set
**Transfer encryption** (default *If available*), a **File extension
override**, and **Tags**.
4. Click **Upload**.
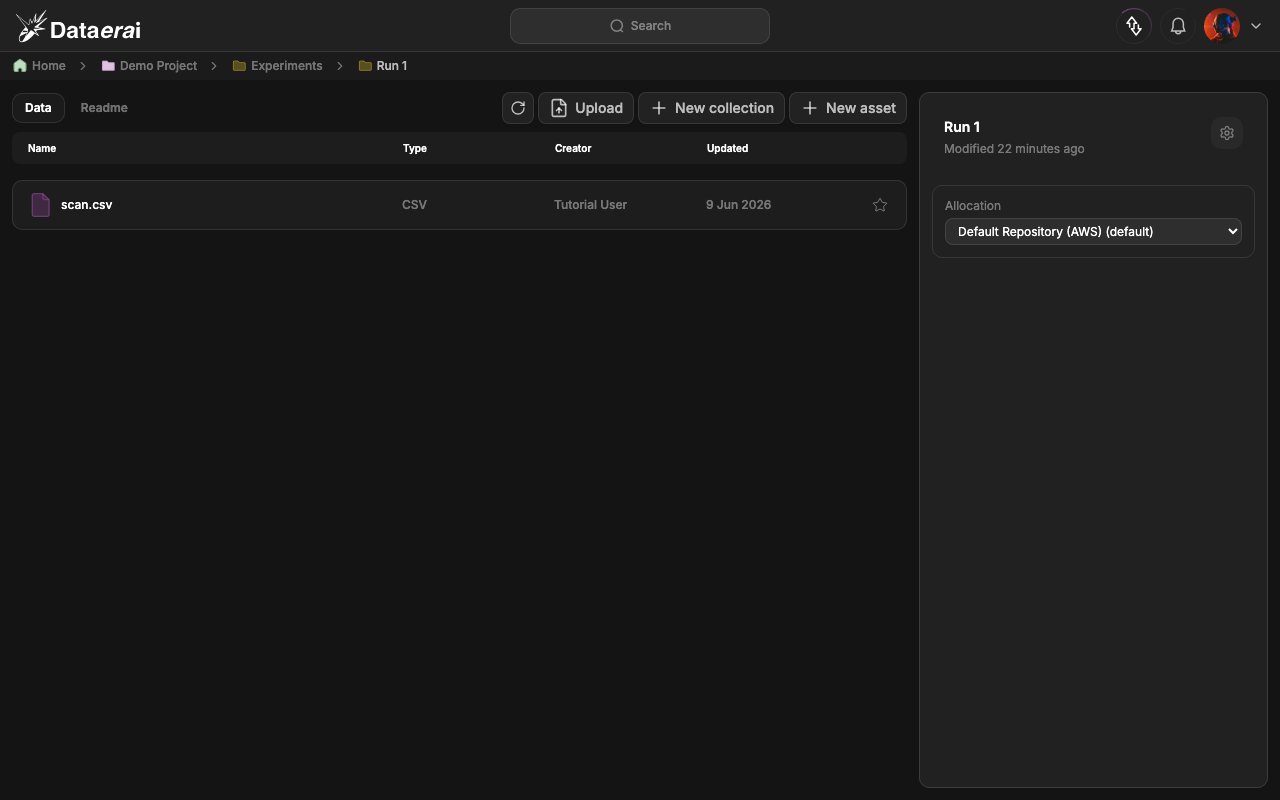
 The new file then appears as an asset row in the collection workspace under the
**Name** column:
The new file then appears as an asset row in the collection workspace under the
**Name** column:
 **From code**
The Python SDK runs the same upload flow as the command-line client. After it
completes we print the destination project's **name** and id — kept from the
create-project response above — next to the new asset id.
```python theme={null}
from dataerai import DataeraiClient
with DataeraiClient(binary_path="dataerai") as client:
result = client.upload(
str(DATA_FILE),
title="My dataset",
owner_type="project", owner_id=PROJECT_ID,
on_progress=lambda p: print(f"{p.percent:.0f}% {p.rate_mbps:.1f} MB/s"),
)
print("destination project:", PROJECT_NAME, f"({PROJECT_ID})")
print("asset id :", result.asset_id)
print("content id :", result.content_id, "|", result.total_bytes, "bytes")
```
## Track your transfers
Every upload and download is recorded so you can watch and audit it.
**In the app**
1. Click the transfer-tracker icon in the top bar.
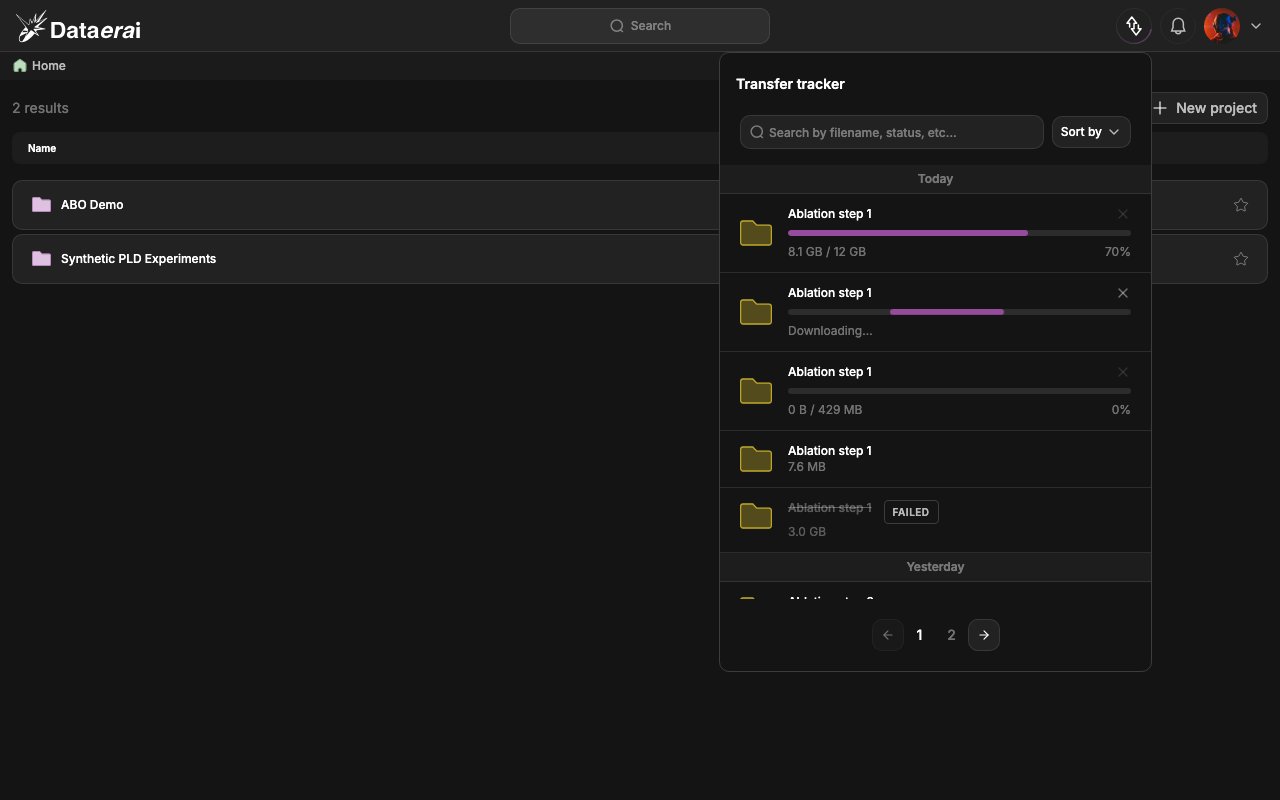
2. The **Transfer tracker** panel lists transfers grouped by **Today** /
**Yesterday** with live progress bars and %, a **Downloading...** state for
in-flight downloads, and a **FAILED** badge on failures. Search by filename or
status, **sort**, and page through your history.
**From code**
The Python SDK runs the same upload flow as the command-line client. After it
completes we print the destination project's **name** and id — kept from the
create-project response above — next to the new asset id.
```python theme={null}
from dataerai import DataeraiClient
with DataeraiClient(binary_path="dataerai") as client:
result = client.upload(
str(DATA_FILE),
title="My dataset",
owner_type="project", owner_id=PROJECT_ID,
on_progress=lambda p: print(f"{p.percent:.0f}% {p.rate_mbps:.1f} MB/s"),
)
print("destination project:", PROJECT_NAME, f"({PROJECT_ID})")
print("asset id :", result.asset_id)
print("content id :", result.content_id, "|", result.total_bytes, "bytes")
```
## Track your transfers
Every upload and download is recorded so you can watch and audit it.
**In the app**
1. Click the transfer-tracker icon in the top bar.
2. The **Transfer tracker** panel lists transfers grouped by **Today** /
**Yesterday** with live progress bars and %, a **Downloading...** state for
in-flight downloads, and a **FAILED** badge on failures. Search by filename or
status, **sort**, and page through your history.
 **From code**
Use the asset's content details to confirm what landed.
The REST API exposes content metadata, including filenames, sizes, and the
`uploading` -> `available` status. It returns JSON metadata only, not file
bytes.
```python theme={null}
content = _api.get(f"{API}/api/assets/{result.asset_id}/content/").json()
latest = content[0]
print("status :", latest["status"])
print("files :", [f["filename"] for f in latest["files"]], "|", latest["size_bytes"], "bytes")
```
## Download data
Fetch the asset back to a local folder and read it to prove the round-trip — from
the app or from code.
**In the app**
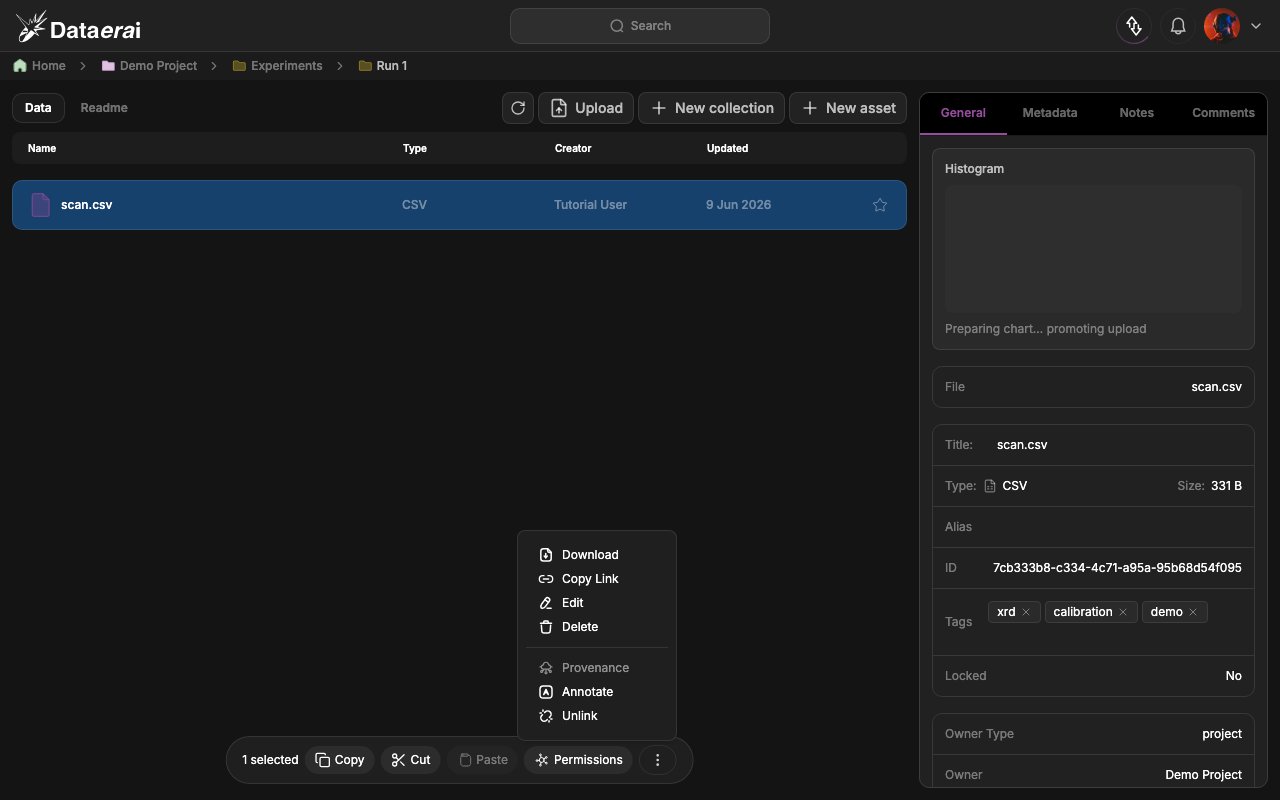
1. In the collection workspace, select the uploaded asset row.
2. Either right-click the row or open the selection toolbar's **More actions**
menu.
3. Click **Download**. (Download is enabled when you have **Read** access to the
asset's content and no collection is in the selection.) The resulting transfer
then shows in the **Transfer tracker** as a download.
**From code**
Use the asset's content details to confirm what landed.
The REST API exposes content metadata, including filenames, sizes, and the
`uploading` -> `available` status. It returns JSON metadata only, not file
bytes.
```python theme={null}
content = _api.get(f"{API}/api/assets/{result.asset_id}/content/").json()
latest = content[0]
print("status :", latest["status"])
print("files :", [f["filename"] for f in latest["files"]], "|", latest["size_bytes"], "bytes")
```
## Download data
Fetch the asset back to a local folder and read it to prove the round-trip — from
the app or from code.
**In the app**
1. In the collection workspace, select the uploaded asset row.
2. Either right-click the row or open the selection toolbar's **More actions**
menu.
3. Click **Download**. (Download is enabled when you have **Read** access to the
asset's content and no collection is in the selection.) The resulting transfer
then shows in the **Transfer tracker** as a download.
 **From code**
`DataeraiClient.download` fetches the asset's latest *available* content into a
directory you provide. We read the downloaded file back and print its content to
confirm the round-trip:
```python theme={null}
DEST = pathlib.Path.home() / "dataerai-tutorial" / "downloaded"
DEST.mkdir(parents=True, exist_ok=True)
with DataeraiClient(binary_path="dataerai") as client:
dl = client.download(
result.asset_id, str(DEST),
on_progress=lambda p: print(f"{p.percent:.0f}%"),
)
for f in dl.files:
print(f.filename, f"({f.size} bytes) ->", f.local_path)
print("---")
print(pathlib.Path(f.local_path).read_text())
```
The byte transfer never flows through the JSON REST API. Dataerai creates a
tracked transfer, streams bytes with resume support, and marks the transfer
complete when the client finishes. The SDK and CLI do all of this for you;
there is no plain REST byte endpoint to call with `requests`.
## Next steps
* [Describe & organize your data](/tutorials/04-describe-and-organize/describe-and-organize)
* [Programmatic workflows with the SDK](/sdks/python)
**From code**
`DataeraiClient.download` fetches the asset's latest *available* content into a
directory you provide. We read the downloaded file back and print its content to
confirm the round-trip:
```python theme={null}
DEST = pathlib.Path.home() / "dataerai-tutorial" / "downloaded"
DEST.mkdir(parents=True, exist_ok=True)
with DataeraiClient(binary_path="dataerai") as client:
dl = client.download(
result.asset_id, str(DEST),
on_progress=lambda p: print(f"{p.percent:.0f}%"),
)
for f in dl.files:
print(f.filename, f"({f.size} bytes) ->", f.local_path)
print("---")
print(pathlib.Path(f.local_path).read_text())
```
The byte transfer never flows through the JSON REST API. Dataerai creates a
tracked transfer, streams bytes with resume support, and marks the transfer
complete when the client finishes. The SDK and CLI do all of this for you;
there is no plain REST byte endpoint to call with `requests`.
## Next steps
* [Describe & organize your data](/tutorials/04-describe-and-organize/describe-and-organize)
* [Programmatic workflows with the SDK](/sdks/python)