> ## Documentation Index
> Fetch the complete documentation index at: https://docs.dataerai.com/llms.txt
> Use this file to discover all available pages before exploring further.
# SDK end-to-end
> Automate Dataerai from Python — connect, upload with progress, read and update metadata, download, and verify.
Use this tutorial when you want to automate common Dataerai work from Python.
See [Tools sandbox](/cli/sandbox) for a ready-to-run environment, or use the
[Python SDK reference](/sdks/python) to install the SDK locally.
## What the SDK is
The **Dataerai Python SDK** helps scripts and notebooks do the same file-transfer
work you do in the web app.
You'll use it to:
* Check who you are signed in as.
* Upload a file with progress.
* Read and update metadata.
* Download the file again.
* Confirm the round trip worked.
Best fit:
* Large files.
* Repeated uploads or downloads.
* Notebooks and automation.
Not covered by the SDK:
* Browsing the full workspace.
* Sharing and permissions.
* Search.
* Project creation.
This tutorial creates a project first, then uses the SDK for the transfer work.
Project creation has no SDK method. The setup code uses a plain `requests`
session against the public REST API: the same call the web app's **New project**
button makes.
Authenticate the CLI once with `dataerai auth login`. The SDK has no
email/password parameters; `auth_status()` reports the signed-in email and
token expiry. Use the public REST API with an access token for setup calls the
SDK does not cover.
## 1. Connect & authenticate
Open a client connection and confirm who you're signed in as. The SDK reports
the same identity the web app shows in the user account menu.
**In the app**
1. Go to your Dataerai site and sign in with your email/password account or
Globus.
2. You land on **Home**, the workspace root listing your projects.
Your signed-in identity lives behind the **user account menu**, top-right (see
[Account & profile](/tutorials/08-your-profile/08-your-profile)).
**From code**
Run `dataerai auth login` once at a terminal first (device-flow login), then:
```python theme={null}
import shutil
from dataerai import DataeraiClient
client = DataeraiClient(binary_path=shutil.which("dataerai") or "dataerai")
client.connect()
status = client.auth_status() # run `dataerai auth login` first
print("Signed in as", status.user_email)
```
## Set up: create a project & sample file (from code)
Create the upload target first, then write a small CSV to upload. Set
`DATAERAI_SERVER` to your Dataerai site and `DATAERAI_TOKEN` to an access token
for your account.
The setup uses the public REST API because project creation has no SDK method.
It calls the same `POST /api/projects/` action as the web app's **New project**
button.
**In the app**
1. On **Home**, click the **New project** button in the header.
2. Give the project a name and confirm — it appears in the Home list.
**From code**
```python theme={null}
import os, csv, pathlib, requests
API = os.environ.get("DATAERAI_SERVER", "https://")
TOKEN = os.environ["DATAERAI_TOKEN"]
_api = requests.Session()
_api.headers.update({"Authorization": f"Bearer {TOKEN}"})
_resp = _api.post(f"{API}/api/projects/",
json={"name": "SDK tutorial project",
"description": "Created from code by this tutorial."})
_resp.raise_for_status()
PROJECT_ID = _resp.json()["id"]
# A small sample dataset to upload.
DATA_FILE = pathlib.Path.home() / "dataerai-tutorial" / "data.csv"
DATA_FILE.parent.mkdir(parents=True, exist_ok=True)
with open(DATA_FILE, "w", newline="") as _fh:
_w = csv.writer(_fh); _w.writerow(["id", "value"])
for _i in range(10): _w.writerow([_i, _i * _i])
```
## 2. Upload with live progress
Upload the file into the project. The client streams progress events to your
`on_progress` callback; `upload()` blocks until the transfer finishes and returns
an `UploadResult` carrying the new `asset_id`.
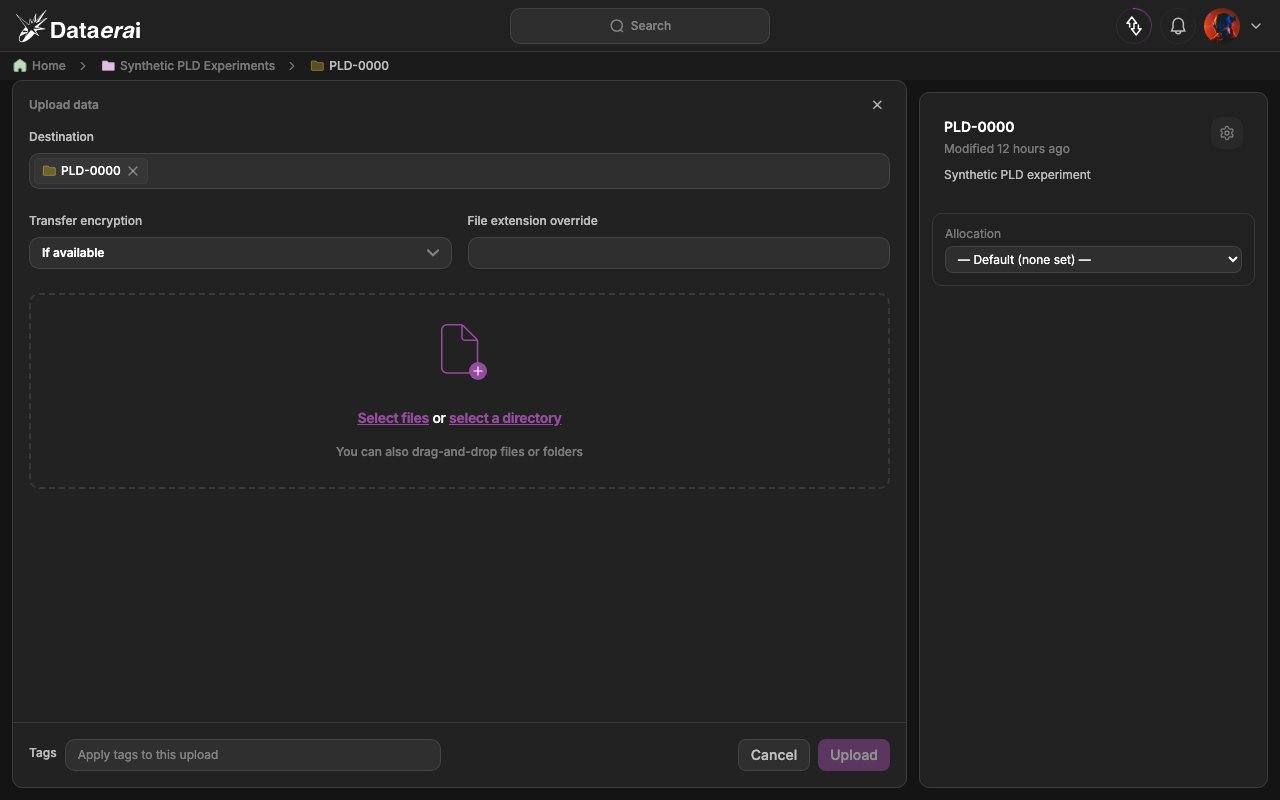
**In the app**
1. Open the project and click **Upload** in the header.
2. In the dialog, **Select files** or **select a directory** (or drag-and-drop),
then confirm.
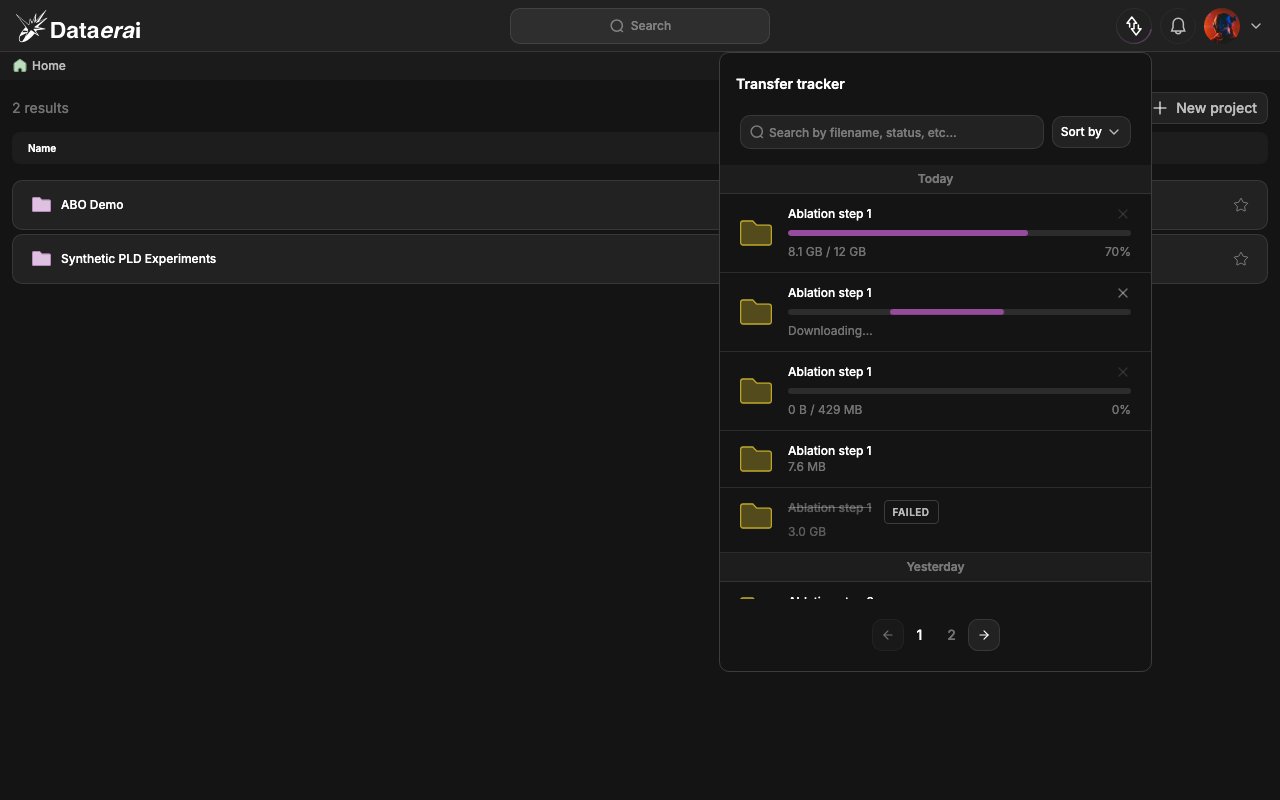
3. Watch the **Transfer tracker** (top bar, *Open transfer tracker*) for the live
progress bar — the UI counterpart to the `on_progress` callback.
These dialogs are shown in
[Uploading & transfers](/tutorials/03-data-in-and-out/data-in-and-out):
 **From code**
```python theme={null}
result = client.upload(
str(DATA_FILE), title="SDK demo dataset",
owner_type="project", owner_id=PROJECT_ID,
on_progress=lambda p: print(f"{p.percent:5.1f}% {p.rate_mbps:5.1f} MB/s"),
)
ASSET_ID = result.asset_id
print("uploaded:", ASSET_ID)
```
## 3. Read & update metadata
Read the asset's current metadata, then update its title and tags.
`get_metadata()` and `set_metadata()` operate on the same fields as the UI:
**title**, **description**, **alias**, **tags**, and the free-form **metadata**
dict.
**In the app**
1. Open the project and **single-click** the asset row to open the right-hand detail
sidebar.
2. Edit **Title**, **Tags**, and **Description** in the overview panel (editing is
gated by the *write metadata* permission, so you'll see the controls only when you
can edit).
**From code**
```python theme={null}
result = client.upload(
str(DATA_FILE), title="SDK demo dataset",
owner_type="project", owner_id=PROJECT_ID,
on_progress=lambda p: print(f"{p.percent:5.1f}% {p.rate_mbps:5.1f} MB/s"),
)
ASSET_ID = result.asset_id
print("uploaded:", ASSET_ID)
```
## 3. Read & update metadata
Read the asset's current metadata, then update its title and tags.
`get_metadata()` and `set_metadata()` operate on the same fields as the UI:
**title**, **description**, **alias**, **tags**, and the free-form **metadata**
dict.
**In the app**
1. Open the project and **single-click** the asset row to open the right-hand detail
sidebar.
2. Edit **Title**, **Tags**, and **Description** in the overview panel (editing is
gated by the *write metadata* permission, so you'll see the controls only when you
can edit).
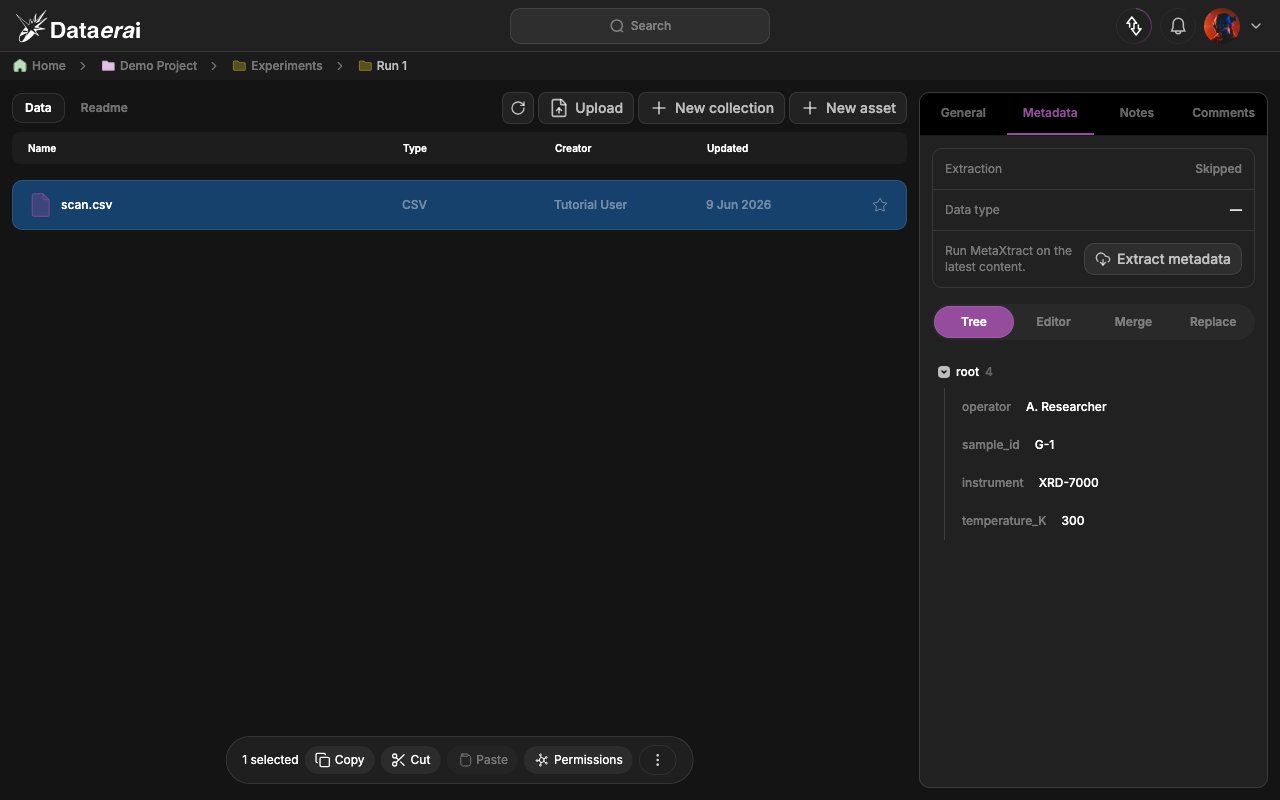 Describing and tagging data is covered in depth in
[Describe & organize](/tutorials/04-describe-and-organize/describe-and-organize).
**From code**
```python theme={null}
meta = client.get_metadata(ASSET_ID)
print("title:", meta.title, "| tags:", meta.tags)
client.set_metadata(ASSET_ID, title="SDK demo v2", tags=["demo", "sdk", "csv"])
```
## 4. Download & verify
Download the asset's content back to a local directory to confirm a clean
round-trip. By default the client fetches the **latest** content version (pass
`content_id=` for a specific one); partial downloads resume automatically.
`client.close()` closes the client connection.
**In the app**
1. Open the asset and use its **download** action; the transfer again appears in the
**Transfer tracker**.
**From code**
```python theme={null}
import pathlib
dest = pathlib.Path("/tmp/dataerai-downloads"); dest.mkdir(exist_ok=True)
client.download(ASSET_ID, dest)
client.close()
```
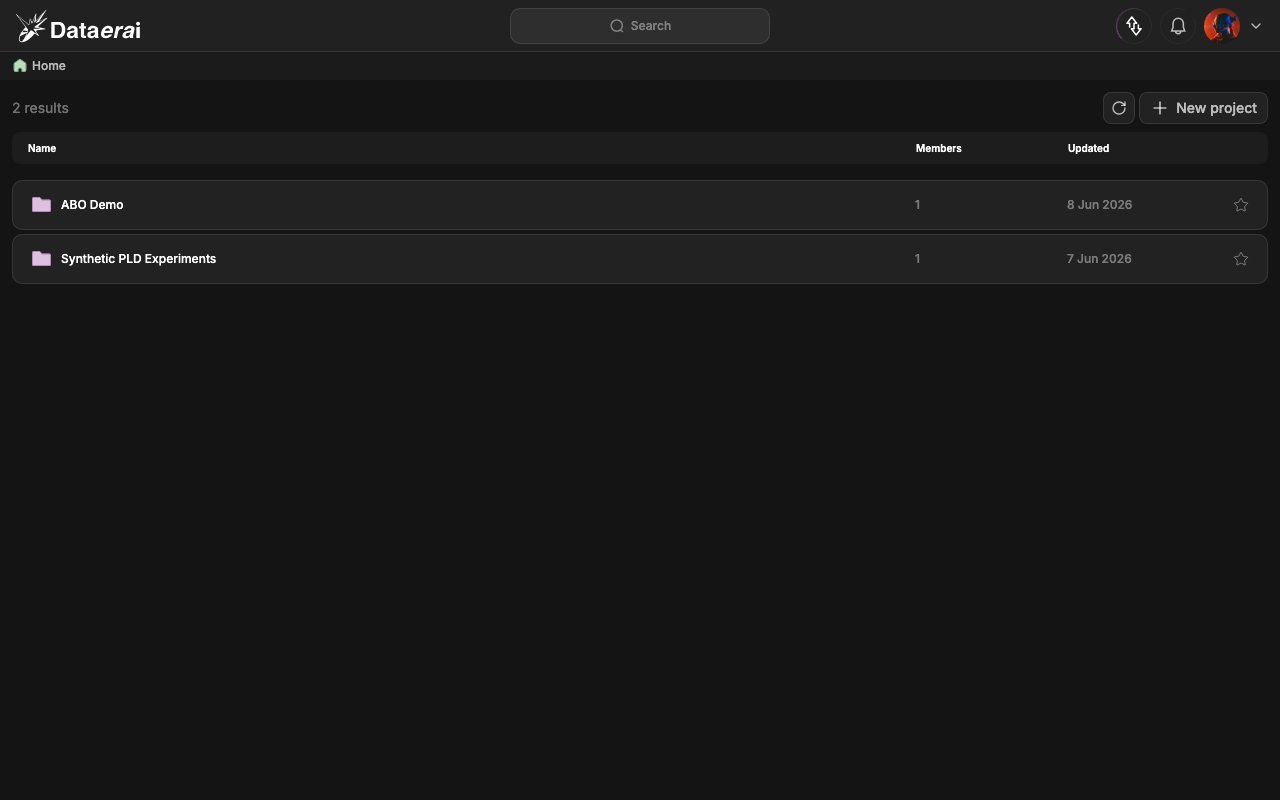
## See it in the workspace
Assets you create from code appear in the web workspace immediately — same data, two
interfaces. Open **Home** and you'll see the SDK-created project and
asset listed alongside everything else.
Describing and tagging data is covered in depth in
[Describe & organize](/tutorials/04-describe-and-organize/describe-and-organize).
**From code**
```python theme={null}
meta = client.get_metadata(ASSET_ID)
print("title:", meta.title, "| tags:", meta.tags)
client.set_metadata(ASSET_ID, title="SDK demo v2", tags=["demo", "sdk", "csv"])
```
## 4. Download & verify
Download the asset's content back to a local directory to confirm a clean
round-trip. By default the client fetches the **latest** content version (pass
`content_id=` for a specific one); partial downloads resume automatically.
`client.close()` closes the client connection.
**In the app**
1. Open the asset and use its **download** action; the transfer again appears in the
**Transfer tracker**.
**From code**
```python theme={null}
import pathlib
dest = pathlib.Path("/tmp/dataerai-downloads"); dest.mkdir(exist_ok=True)
client.download(ASSET_ID, dest)
client.close()
```
## See it in the workspace
Assets you create from code appear in the web workspace immediately — same data, two
interfaces. Open **Home** and you'll see the SDK-created project and
asset listed alongside everything else.
 ## Next steps
* [Python SDK reference](/sdks/python)
* [Tools sandbox](/cli/sandbox)
* [Uploading & transfers](/tutorials/03-data-in-and-out/data-in-and-out)
## Next steps
* [Python SDK reference](/sdks/python)
* [Tools sandbox](/cli/sandbox)
* [Uploading & transfers](/tutorials/03-data-in-and-out/data-in-and-out)